
Sorry - spoiler alert.
Good evening all - news of my death has been greatly exaggerated and I'm back tonight with something non marine (or robot) related.
Tonight I'm following Tylar's lead and bringing you a post that is more scenery related.
The reason I'm doing this is that I've tried salt weathering for the first time and thought you may benefit from my trials and errors.
So we've all seen the rather awesome containers from Games Workshop...

Well my plan was to use them in lieu of building on my gaming table so they will offer valuable cover to most sized units (including Questoris Knights) and as such I needed a lot of them and a paint scheme that was both quick and painless.
I decided that the majority (if not all) my containers would be based in a Mechanicum shipping facility and so would be red ala the scheme on the GW website but I did want them to be heavily used and be applicable to my city table and my zone mortalis board.
So once the containers were built I gave them a liberal spraying with a can of Leadbelcher.

Once this had dried I added some weathering to break up the uniformity - this was done with a 1:1:1 mix of warplock bronze, rhinox hide, leadbelcher and applied with a natural sponge (bought from an arts and craft store). Once this had dried I applied patches of Agrax Earth Shade to tint the metals. I focussed the weathering to the underside of the container and the bottom of the doors with patches dotted around other areas like the edging of the doors.


So with the under painting done it was time to apply the salt - which would act as a mask for the sprayed layers which would act as the containers colour.
With the salt more is more - I found that there seems to be too much salt applied when it's actually the right amount. Simply paint water on to areas you want the base metal to show through the sprinkle salt on the areas. I used a mix of sea salt and table salt and once applied I left the containers outside to allow the water to dry and once dry I rubbed the areas slightly to make the areas less uniform. I again focussed my efforts around the bottoms of doors and side panels and the underside of the containers.


My first coat was with a red primer from Halfords here in the UK but I guess any matte primer spray would also work. I made sure I had a good even coat all over (I did notice some salt falling off at this point but didn't worry too much).

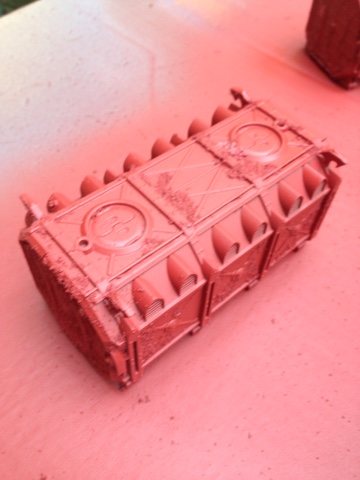
Now for the moment of truth - the removal of the salt.
My weapon of choice - a cheap/firm toothbrush (bought in bulk from a local supermarket - do not use YOUR toothbrush for this step)
In circular motions I rubbed (hard) at the textured salt to aid its removal. I found some areas I had to use my fingers and some areas the salt was stuck fast so I scraped with the toothbrush handle. I was pretty pleased with the results...


For now here's how they currently look on my table...


KF
Nice technique :-) Thanks for the step by step :-)
ReplyDeleteYay King Fluff is back <3
ReplyDeleteYeah, salt weathering is like seriously sorcery if you do your undercoat well enough.
ReplyDeleteLooks amazing! A wash of earth shade would really help the detail contrast without losing the vibrancy of the red... although you might need a bucket of it for as many containers as you have! Maybe try the minwax floor shade like I have heard people do?
ReplyDeleteHave you seen the cheaper Containers due out from Gamemat.eu, four resin boxes more along the lines of FW design and less arches and gothic points. £23 plus PnP.
ReplyDeletehttp://www.gamemat.eu/our-products/terrain/industrial/container-set-not-painted/en/
Look great so far, like others have said , hit them with a waslayer to make the details pop.
ReplyDeleteInteresting technique, thanks for sharing
ReplyDelete