
I was asked around a month ago to do a post on how I go about posing my dreads. I have recently built a contemptor for my Emperor's Children and took some photographs as I went to show off the process that I go through.
I always aim to pose the dreads in a human way. What I mean by that is no poses that I can't do myself. So if the dread is running it's legs are alined in a way that you would expect to see from an athlete running on a track. Legs don't bend back much at the hip and should stay inline with the back.
The other thing to remember is that they are very heavy!! I imagine that they are agile and able to do whatever a marine could do but with a lot more weight. This means that the joints and stance of the legs will need to compensate for this weight. Legs are therefore unlikely to ever be completely straight and wide stances would be used to balance themselves.
Momentum will be a huge factor in a dreads ability to cause damage. They have weight and would want throw that weight around. As such I think arms will keep moving and hips keep turning to stop them from getting bogged down.
I chose to start with my double close combat contemptor for the EC and a knew I wanted it running forward, cutting enemies down as it went.

Get all your parts cleaned up and cut off the sprue. Get some blue tac ready, you will be using it for setting out your pose.

Example of how I apply the blue tac. Be patient, it can be a pain to get it stick together sometimes!

As I wanted the running pose I started with the legs and working out a rough layout for them. All of this is blue tac'ed together. The blue tac under the feet is built up a bit and will potentially end up as green stuff. Adding some green stuff under the feet will help you to lift the feet and create some more dynamic poses. It can be covered by your basing materials later.
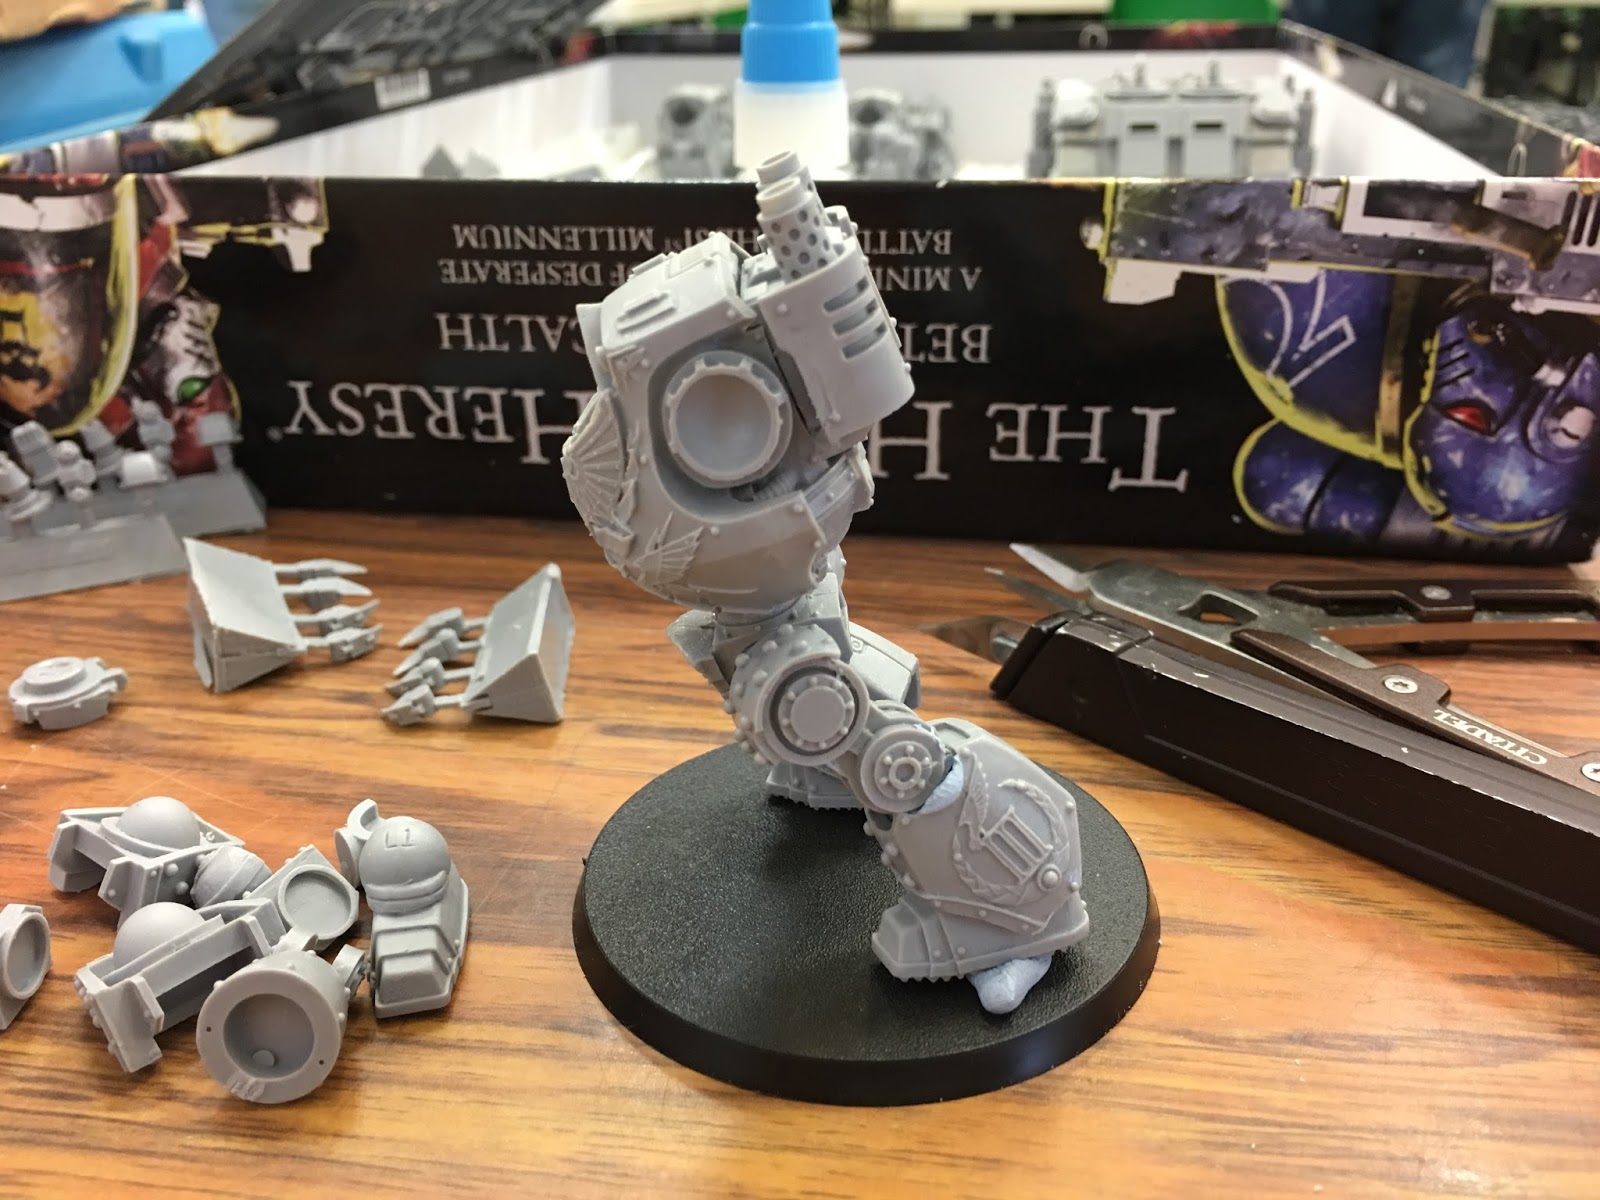
Torso and hips added to check that it works. The current layout is what I was referring to above with the running poses.

I often add green stuff to joints at the hip and feet to give a wider range of movement to them, this again allows you to creates a more dynamic pose. The blue tac can work like green stuff to space joints to give you an idea of what movement you might be able to achieve.
I have started working on the arms. Originally I had planned to have the front arm shooting and the back swinging back ready for a punch. This changed as it went along and I ditched the front arm shooting in favour of creating a bigger looking punch.

By removing the front arm from shooting it freed up the pose a lot. I turned the hip more to create the dramatic back swing of the left arm. One thing to note it that you need to pick a focal point for the face. This would be the enemy that he is fighting, I turn it to be looking at them along the line of sight of the primary weapon that it is currently using. For example a dual shooting weapon dread will be making use of the one of the arms and it will be looking down the barrel of that gun, straight at what it is shooting. In the case here he is looking at the thing he is about to swing his fist into. I added a bit of green stuff under the head to lift it up slightly as the torso is angled down a lot.
Use the hips to tilt and turn the dread. I have both of the hip joints pivoting in slightly different directions and angles to create movement. Experiment with turning them all to get a feel what they can add to the appearance.

I have reached a point I'm now happy with. Now start pulling bits off and get the glue and green stuff out and carefully recreate each part of the pose. It will change slightly as you get glueing, the blue tac pushes the parts apart more than the glue will so it won't quite look the same and some parts don't hold as well with the blue tac and sag slightly.
Here is the final pose on the dread.


I'm pleased with the final pose. I did mess up the claw on the left arm. I glued it at the wrong angle. The claws should have been on top. I noticed it too late and the glue had set! I'm deciding if I'm ok with it or not, so I may change that.
Hopefully you have been able to pick up a tip or two, comment below if you have any further questions. I have another 2 contemptors to build for the EC so can expand more if needed.
Happy Hobby!
Darien
The issue I had with my Kytan and Broadsides was mostly in the "switch from blu-tac to glue" stage. The working time with superglue is so short that it was really hard to confirm that I had the angle right with time left to shift it before the glue set if I didn't.
ReplyDeleteThis is pretty much exactly what I did with my Redemptor, tho, and I'm totally happy with that. With the extra working time from plastic cement, I was able to tweak it to just how I wanted.
This can be a problem. I tend to do piece by piece only removing the blue tac when for a component when I glue it together. I used Gorilla super glue and this tends to glue in the right amount of time I find!
DeleteGreat step by step, thank you. I am left with one question: How do you get the blue tac off without it making a big mess of the model?
ReplyDeleteDab it with a bigger ball of blue tac and have it removed before you start applying wet glue is my tip.
DeleteWhat Siph said!
DeleteGreat posing, the only thing I’d do differently is when gluing I use a blob of 2 part epoxy for strength and super glue for the instant solid bond to hold position whilst the expose dries. Super glue on its own I find too brittle.
ReplyDeleteI use Gorilla super glue and this is anything but brittle! In fact once it's glued the resin will give way before the bond!
DeleteNicely done chief. I have only worked with the BaC contemptor sadly, but will keep this in mind for when I get a chance.
ReplyDeleteThank you! The Forge World dreads are well worth the money!
DeleteVery nice. Have a question though, say you had the model all assembled and noticed an error (or they came out with a new part and you realize you should have magnetized) Is there a good way to break the super glue's bond with out damaging the model?
ReplyDeleteI believe you can purchase a solution that undoes the super glue bond. How this would react with resin I don't no. If will also depend on what glue you've used in the first place. A lot of super glued parts can be snapped off with no damage. I use Gorilla super glue which does not snap apart. >.< some careful work with a knife can also get you the result you need. Best bet is to not make any mistakes!!
DeleteGreat article with some really great tips in. Already itching to get another dread now! Cheers.
ReplyDeleteThank you! I always have the itch!!
Delete