Showing posts with label Conversion. Show all posts

Sunday, 26 June 2016

Legion Praetor Tribune - Make him Yours


So if you were lucky enough to get your hands in one of these yesterday, or hoping to get one today what are you going to do with it....?

Here's what I did with mine:


In true kit-bash and conversion fashion, which I know followers of the blog will recognise as my 'thing' I decided to make him mine...or Dorn's, depends on your lean. LOL. 

I'll take you through what I did and why. 
So first thing is how do YOU out there in the blogosphere follow my lead?

It's easy. Keep it simple. Pick a few things that signify your legion, where they've come from or what a signiature trait is you want to use. And then if you want to go that next step create a back story.

For me there's nothing more significant than the Unification Eagle which ties in with the lightning bolts already on the mini. Plus the back story of the Praetor Tribune rank comes from the post Unification, Great Crusade apex era. 


Also for my own table 'Avatar' I've taken the back story of a Phalanx Warden promoted into the elite Assault Cadre of Senechal Rann. So the crossed axes from the Phalanx wardens needed to feature also. 


The easiest way for me to do that was to use a press/push mould of some Imperial Fist detail I have and then add some etched brass. 

First thing....wash. 


Surprisingly there was either no or very little mould release so after only a few hrs I was happy it was clean. I did use a tooth brush though to make sure. 

Parts. 


So after cleaning I also selected a 'better head' and one that fitted with my theme. 
Now I'll be honest at this point. I really like the model and the pose. The head though is awful. 
I chose the Phalanx Warden Vet Sgt head as I had it spare and I love the shouty pose. 

So make him an Imperial Fist. 


That required adding some legion etched brass, which meant some detail removal. Don't be afraid to remove detail some times. Whilst you're moving away from the 'original' mini, your sole intention is to make it yours anyway so a small removal adds more benefit in the long run :)


Now the first thing I did when I got home was pull out my push moulds and additional detail 'bits and bobs' so I mixed up some green stuff straight away. 
After this had cured for about 3-4hrs I pulled them out while it was still on the softer side of curing. 

Now the moulds I will have to go through at a later date but if you google search for 'Blue-stuff' you'll find what I've used and there are some tutorials knocking about too. 


Here you can see the Phalanx Warden shield detail taken from the Warden kits shoulder pad. This small addition adds to my theme and narrative. Small but effective.


Another small addition of etched brass continues the VIIth legion theme. 


So all the parts ready for assembly. Now I had to file down some of the detail on the rear of the head for it to fit in the space again I was willing to take the hit to get the look I wanted. I had one final detail to add. 


I removed the tiny bit of central detail on the chest piece to make space for my Unification Eagle head. 


There we have it glued pride of place surrounded by lightning. ;)


Here you can see a test fit. I ALWAYS do this to ensure the pose and parts fit and match the look I'm after. Best to be safe.


Final dry fit poses. Just goes to show a little can go a long way :D

So there you go guys. I hope you like what I've done and you can take inspiration from it. As ever I'll happily field questions or help with ideas and modelling tips. 
Enjoy your Tribunes and make them YOURS ;)

- Tylar

Monday, 20 June 2016

Making the Very Best of Versatility


After the most recent WIPR on the blog a few people asked after my magnetised Phalanx Wardens. 

Now I guess I hadn't thought that this was anything other than normal. I forget myself sometimes and that I've been doing this a very long time and therefore I've had a lot of practice. 

So how to get the best from versatility. 

This can be transposed to any models really. Especially the new BaC minis if you want to run different weapons on a Vet Squad. 

The key to this is patience. And picking the right parts. 


Apologies for the pics it's quite hard to get decent shots one handed.
So here you can see I've substituted in a plastic right MK IV arm from the BaC minis. This was to provide a better platform for inserting a magnet. And it would marry up to the majority of the weapons options. 


Here you can see I've taken one of the small 2mm x 2mm magnets and I've added it to the one already fitted to the arm. I do this everytime to ensure the polarity is correct then the weapon hand will always fit. 

You'll need:


2mm x 2mm Magnets! I buy mine from Tabletop Tyrant/Gifts for Geeks (same company). They also make their own carry cases too. 


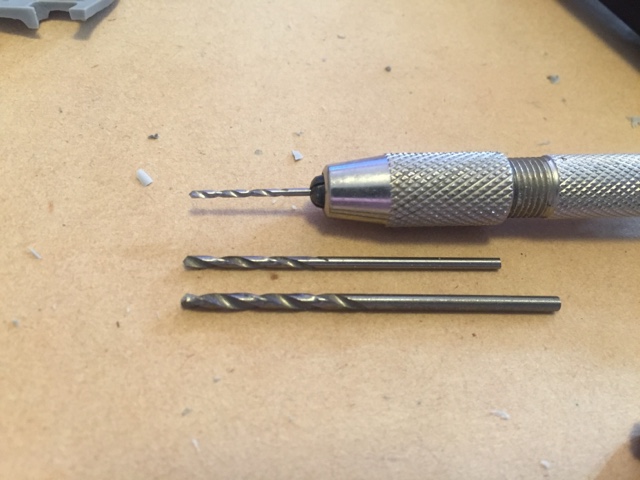
A 0.8/0.9mm drill bit and pin vice to complete the pilot hole. This I also use for paperclip 'pinning'. 
A 1.0/1.2mm drill bit for widening the hole if you wish. 
Then a 2mm drill bit for the required hole size. 


Drill the pilot hole. 
If you want feel free to widen it. 
I personally go straight for the 2mm bit as the plastic is soft. 


Here the 2mm hole is widened ready. At this point I'll offer it up to make sure it's a snug fit. Then apply a tiny amount of super glue. 


Magnet fitted. Leave to dry for 5-10 seconds. 

One Phalanx Warden with a shiny new Combi-plasma :)

I've done this for two of my Wardens as for every 5 I have that option of a special weapon or combi-weapon. I could have also done it for my Vet Sgt in hind sight but as I have several Vet Sgt options this wasn't an issue. 

Again as I said you can do this for any mini really especially using the BaC minis. 
I hope this was helpful to you all out there and if you want to see more or have any questions fire away and let me know. 

Until next time 

-Tylar ;D

Saturday, 16 January 2016

What to do with left-overs?


Now I'm not talking about your last meal so don't worry there. 

For anyone who has ever built a Storm Eagle or Fire-Raptor there's always parts left over. 
I was sat around thinking that this was not only a waste of plastic, but a wasted opportunity. 
So what could I do with the left overs?

I decided to put my scratch building skills to a solution. 
With the help of some graph paper and a small steel rule I set about making templates that would allow me to make something. 


I decided that I would build my own Storm Raven out of plasticard and have it as a crashed terrain piece. Over the next month I set about building parts from scratch by measuring the original parts and making templates. 

Here's how it unfolded:


You can now see it start to take shape:


After this was the next phase of layering to get the correct hull shape. 


Slowly the main hull shape has taken form. 


Next was to make new wings that would sub in for the ones used on the Fire-Raptor. 


Finally sections added ready for engine bodies to have the beginnings of structure. 

So there you have it. That is where the project lies currently as it was put on hold prior to the Xmas period so I could focus on my marines. 
It goes to show where a little imagination and some planning can take your hobby. 

I hope you've enjoyed an insight into my little project. 
If you have any questions or feedback please feel free to comment below. 

Until next time. 

- Tylar :D


Monday, 23 November 2015

Thinking Outside the Box


So for my return post I decided to do something a little different. 
When we talk about 'thinking outside of the box' as gamers a lot of the time this relates to either tactics or army lists. 
Today I'm looking at the modelling side of this phrase. 
So rather than just being 'outside of the box' sub in for box, clam shell, or packet. 

What is Tylar rattling on about....simply put conversions, re-poses, and kit bashing. 
Today I decided to get over my Warp Fatigue by taking the new plastic Contemptor and showing you all what can be done. 
I have heard so many people moaning about the plastic Contemptor. 
It's not posable, why isn't it a kit....wah wah wah....
I'm pretty sick of it to be fair. 
Why..?
3 years ago most would have fallen over themselves for a plastic Contemptor. 
Now we have one, it's not good enough.  
I beg to differ..
And I'm going to show you why. 

Now in fairness I have been doing this for the best part of 27 years and I've had plenty of failures along the way. Confidence in your own abilities and the will to take your modelling up a notch maybe the difference in an OK model and one that people go, 'Wow how did he do that?'

Here I'll show you a step by of how I re-posed, added to, and 'converted' my plastic Contemptor by 'Thinking Outside of The Box'. 
Rather than a full commentary I'll post up the pics and if you have any questions feel free to comment below.

So he we go...

The first cut is the deepest....
The kit broken down and the tools I used. 

Kheres cut ready for repose. 

The multi-melta in the same phase. Now at this point I decided to go with this as the main weapon. 

Built ready for repose. 

Legs cut away from the main body. 

From above. 

Body prepped. Now at this point I must say fit and glue to two side parts first this makes the body sturdy and allows the front to fit easier. 

 Now at this point you can stop. You're all good. However if you're like me that's just not enough. So.....

Before I glued the front part....off with his head!

You'll need to carve out the back of the head section to allow some rotation. 

Normally I would have spent the extra time with some green stuff but I wanted to prove anyone can do this so I glued in a piece of sprue I cut off. This will help hide the extra gap when the main body piece is on. 

Like so. 

To secure the torso and legs I used a small piece of plastic tubing. 

This helped secure the torso and allowed the right rotation for the pose I was after. 

Starting to look good :)

The bits that make it stand out from the rest. Admittedly not everyone will have access to these kinds of extra parts. But what you can't necessarily achieve with these you can make up for with transfers or painting skills. 

The parts I chose are from a variety of places. I have a push mold green stuff unification eagle, a flattened banner from the Imperial Fist Templar brethren, this tie with the story of he Contemptor being a former member of the brethren, and some parts from the Black Templars plastic upgrade kit. I also have used etched brass and one of the Cataphractii shields. 

Assembled at the end. The arms are just pinned for now ready for paint. 


And finally two shots with banner. 


Now as I said I've had some practice over the years. But I did all this today in 6 hours. 
If you have an hour or two free a night think what you can do with your plastic Contemptor. 
Enjoy and feel free to ask any questions below. 

- Tylar.

Edit/Adition - One thing I forgot to say is have an idea and if you can, have a story. That way it will add to the dynamic of your miniature. Like this Contemptor he represents a previous member of the Templar Brethren. The next will be a previous member of the Phallanx Wardens and an assault Veteran.
It will aid you when thinking of parts to add or symbols to incorporate. 

- Tylar.