Showing posts with label scenery. Show all posts

Saturday, 23 September 2017

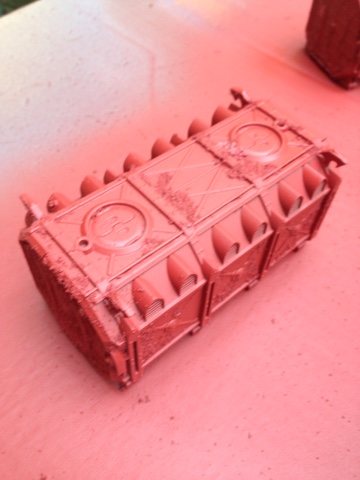
Necromunda terrain: Red Fuel tanks

Hi all

Another part of our Necromunda terrain project is completed. 

I have painted these in a nice industrial red scheme. Contrasts the greys and silvers very nicely. 


How I painted it:

Undercoated black. The metal plates were then painted with Mephiston Red. 

I then cut "I" shapes into plain white transfer paper and stuck them on to the side of the tanks. I then sponged Mephiston Red on to certain parts of the transfer to make it look like it has been chipped off. Then wear and tear was added to the corners of panels to weather them. 


To chip I made a mix of equal parts Dryad Bark, Warplock Bronze, Abaddon Black. This was then sponged on using reverse tweezers to reduce hand ache. 
I then covered the white pieces with a wash of equal parts, Nuln oil, Agrax Earthshade and Klear (floor polish) with a splash of water. Before it drys on each face/segment, with kitchen towel splodge it off and also make down ward wipes to add a look of streakiness to the red surfaces. This method if do swiftly also leaves a modest amount of the wash in the recesses. 

Further streaks are done using a mix of Seraphim Sepia and Lahmian Medium. 

Thanks again

Drake Seta

Wednesday, 20 September 2017

Necromunda terrain: White fuel stack

Hi all

I have been progressing on some terrain after finishing my two Warhounds. The gantries and stanchions are very long winded to paint, so between work on these, I have been working on the Promethium assets. 


Here is the first Fuel tank/chimney device I have finished. 

The recipe I used was a simple one. 
Corax white spray all over then I painted the metal work Leadbelcher and pipework Warplock Bronze. 

I then painted the gold plates retributor gold and commenced weathering. 
To chip I made a mix of equal parts Dryad Bark, Warplock Bronze, Abaddon Black. This was then sponged on using reverse tweezers to reduce hand ache. 
I then covered the white pieces with a wash of equal parts, Nuln oil, Agrax Earthshade and Klear (floor polish) with a splash of water. Before it drys on each face/segment, with kitchen towel splodge it off and also make down ward wipes to add a look of streakiness to the white faces. This method if do swiftly also leaves a modest amount of the wash in the recesses. 

Further streaks are done using a mix of Seraphim Sepia and Lahmian Medium. 

Thanks for reading. 

Drake Seta


Friday, 2 December 2016

Hector Cephas - Non-legion projects

Hi everyone,

Much like Castiel, I'm going to write about some projects that are in progress and what is to come in 2017.  For this post, I will cover some of my non-legion projects for Horus Heresy - my Imperial Fists deserve their own post!

Legio Custodes (Talons of the Emperor)


As you are probably all aware, I have got my hands on a few Custodes sprues and have built 20 of them all in all. My plan for this army is pretty simple - build an allied detachment of Custodes to play alongside my Imperial Fists for the Siege of Terra (hence needing about 20 as opposed to just a one sprue of 5 for a small warband attached to the legion for whatever reason).

I plan to have these painted up by the end of January so this will be the first project I'll be taking on next year. I do not intend to expand any further on this army as it is only really intended to be a small force.

Questoris Knights

Ever since the plastic knights were released for 40k, I've wanted a knight household army - I just love the different backgrounds behind the different houses. I have some already, just haven't done anything with them yet - I even have a Knight Castigator! I hope to at the very least make a start on these mid to late 2017.

Scenery


This is very much an on-going project - I have plenty of buildings and fortifications that are unfinished, a realm of battle board that is base coated and plenty of spares and cool ideas for more stuff for my board. I've got most of the chassis of a Baneblade, I wonder what I could do with that... and a land speeder, it would look cool if I had a crashed one on the board... etc etc.

All in all, plenty to work with and a lot for you all to look forward to during 2017.

Until next time!

Hector Cephas

Wednesday, 19 October 2016

Scenery: Making wargaming great!

Hi guys,

Today I'm going to discuss an aspect of the hobby that can be overlooked but really makes our games that much cooler to play - yes, I'm talking about scenery.


With the focus of our hobby being on the armies we build, paint and play - it's only natural that scenery takes a bit more of a back-seat role in the hobby... however, when you compare some of my work in progress pictures to some of the other photos that are shown on the blog that have buildings in them, it suddenly makes the models look more like soldiers as the background sets the scene.

Same really applies in game too, scenery gives you something to fight over - be it a city that you are fighting over, a vitally strategic spaceport you are trying to capture, an isolated skirmish in a forest to disrupt a supplies convoy and so on. The scenery really can add to the narative of a mission by providing a visual aid and as a result make our games more immersive too.

Furthermore, scenery adds to the game mechanically too. From a tactical standpoint, scenery can provide you with cover from enemy fire, obscure your advance by denying line of sight for a turn while you prepare for your next move or force your opponent to commit to a costly offensive to remove you from an entrenched objective. This is why its great visiting places like Warhammer World to play as they have gaming tables to play on and if you get the chance to, I highly recommend booking a feature table as they are simply superb!

What are your thoughts about scenery in general? What kind of scenery would you like to see for games based in the Great Crusade and the Horus Heresy?

Until next time!

Hector Cephas

Thursday, 15 September 2016

What's in the box? Pt2: Containment protocol - accomplished

Good evening all. 

Glad to be back in the saddle from my brief hiatus and looking to get some hobby on.

Tonight I bring you a chunk of completed hobby (for a change I can all hear you shout). The last few days have seen me square away the first portion of containers that I started a while back.

As you may remember I used salt weathering for the first time on these as a means of testing out the process on something less than vital to my crusade era forces.

When I last posted this is where they were at...


Obviously this was only part done but as I was batch painting these it took a while to get the 9 upto this stage.

Even though I had brushed (vigorously) to remove the salt I found that, as I'd used cellulose paint and not an airbrush, some of the salt was resisting my attempts at removal...

Que the H2O..


After a brief dunk all the excess salt dissolved and was easily removed with a final cursory scrub.

Next stage was detailing and transfers. Very simply I painted the stud skulls with Valejo's Old Gold, dry brushed the keyboards and vents with Leadbelcher and painted the servo skulls with the same method as on my Night Lords; 

Steel legion drab wet brush
Argax earth shade wash
Karak stone wet brush
Ushabti bone dry brush
Skull white highlight

I then applied the transfers. I divided the crates into blocks of 6 and 3 so that the identification marks would cycle in lots of 6 - handy in future to use these as objectives in games. I went for generic Mechanicum for the simple reason that these will be used in lieu of buildings on my city fight table and as free standing scenery in my Zone Mortalis games, and as I have several armies it made sense to have the containers as equipment shipped from Mars to assist in the war effort (regardless of which side you're on).


Once the transfers were on it was time to try another new technique - the pin wash. I know a lot of great painters use this process (including our very own Drake Seta) but I'd never been brave enough to try it on anything other than test pieces. So I went in two feet first and eyes closed.

The first stage was sealing the paint - for this I used Purity Seal. I've read a lot of criticism about purity seal and to be honest I've never had an issue - however on this occasion I did. Half the containers started to frost up. I had read re-spraying immediately can reduce the effects - which I did and also to spray another varnish on also removed it - which I also did (with the Army Painter anti-shine matte varnish). Even after those salvage attempts some of the containers looked a little pink in places. I had to take it on the chin and move on, hoping the next stage might rectify the problem.

Next I mixed up some thinners with Burnt Umber oil paint (I stumped up for the good stuff). I mixed until it was the consistency of emulsion paint.

Then I applied a coat, covering all the containers parts in one pass.


By the time I'd coated all 9 the first one was ready to be rubbed within an inch of its life - I chose kitchen roll for this job, rubbing loosely all over then rubbing in one pass with my thumb in the triangular sections made by the ribbing on the container sides. I also paid extra attention to where the transfers were.


I found that a little thinners on a brush and a quick swipe across the transfers helped them to pop a little more.

And so the 9 containers were done...


And in situ on a gaming board section...


And a little fun...


Now it's just a case of repeating the process for at least another 9.

Hope you enjoyed seeing something actually finished for a change - something I hope to emulate in my next post concerning the boys in midnight clad.

And remember - never trust a skinny chef.

Peace out.

KF
Tuesday, 30 August 2016

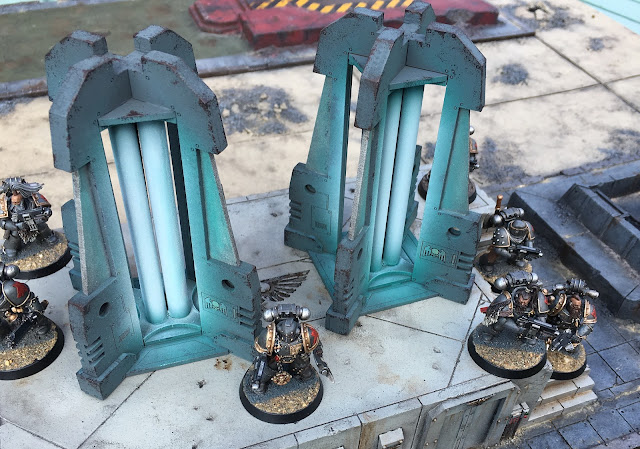
Plasma Generators finished

Hello all. 

You may have been following my journey with the MDF Plasma Generators I purchased from eBay. Well they are finished now and here they are. 


I used some wide straws from IKEA for the tubes instead of the block square Perspex that comes with the set. 


Then I sprayed with Mechanicum Standard grey. I added chipping with a mix of 1:1:1 chaos black, dryad bark and warlock bronze. 


I then airbrushed jade green to horrid green as if the light was coming from the tubes themselves. 

I followed it up with White scar for the tubes themselves. 

That's it then. 

Onto another 3 Vlka Fenryka and the next battle report for me :)

Drake Seta

Tuesday, 16 August 2016

MDF Plasma Generators - like in Dawn of War

Hi all. 

Occasionally as fans there are situations where we really want to create bits of terrain from what we see in 40k art, comics, stories and computer games. One such thing for me was the buildings in Dawn of War. 
I would have loved to have gotten round to creating a Space Marine strongpoint and barracks based on the designs in the PC game. Fortunately the Castellum and Thunderhawk Landing pad give you a good core to expand from and also provide good alternatives to the Vehicle factory and Strongpoint terrain pieces. 

So when I saw this on eBay I really wanted a set. 

They are based on the Plasma Generators from Dawn of War clearly. 


They are effective bits of terrain and will add that little bit extra to Mortalis or Strongpoint games. 

Would be nice if they were LED but beggars can't be choosers. 

Any recommended paints or techniques to get the illumination looking decent?

https://www.ebay.co.uk/itm/112077865286 
Item can be bought from here

Drake Seta

Friday, 22 July 2016

What's in the box? Pt1

Well on this occasion NOT Gwenyth Platrow's head...

Sorry - spoiler alert.

Good evening all - news of my death has been greatly exaggerated and I'm back tonight with something non marine (or robot) related.

Tonight I'm following Tylar's lead and bringing you a post that is more scenery related.

The reason I'm doing this is that I've tried salt weathering for the first time and thought you may benefit from my trials and errors.

So we've all seen the rather awesome containers from Games Workshop...


Well my plan was to use them in lieu of building on my gaming table so they will offer valuable cover to most sized units (including Questoris Knights) and as such I needed a lot of them and a paint scheme that was both quick and painless.

I decided that the majority (if not all) my containers would be based in a Mechanicum shipping facility and so would be red ala the scheme on the GW website but I did want them to be heavily used and be applicable to my city table and my zone mortalis board.

So once the containers were built I gave them a liberal spraying with a can of Leadbelcher.


Once this had dried I added some weathering to break up the uniformity - this was done with a 1:1:1 mix of warplock bronze, rhinox hide, leadbelcher and applied with a natural sponge (bought from an arts and craft store). Once this had dried I applied patches of Agrax Earth Shade to tint the metals. I focussed the weathering to the underside of the container and the bottom of the doors with patches dotted around other areas like the edging of the doors.


So with the under painting done it was time to apply the salt - which would act as a mask for the sprayed layers which would act as the containers colour.

With the salt more is more - I found that there seems to be too much salt applied when it's actually the right amount. Simply paint water on to areas you want the base metal to show through the sprinkle salt on the areas. I used a mix of sea salt and table salt and once applied I left the containers outside to allow the water to dry and once dry I rubbed the areas slightly to make the areas less uniform. I again focussed my efforts around the bottoms of doors and side panels and the underside of the containers.


Once the salt layer was dry I laid them all out and began spraying. Now I've seen this technique used before with airbrushes but my intention was to use spray paint - so I prayed that the technique would work out for me.

My first coat was with a red primer from Halfords here in the UK but I guess any matte primer spray would also work. I made sure I had a good even coat all over (I did notice some salt falling off at this point but didn't worry too much).


As you can see the salt sits on the Duracell as texture. Once dried I did a zenith highlight with a can of Mephiston Red.


Now for the moment of truth - the removal of the salt.

My weapon of choice - a cheap/firm toothbrush (bought in bulk from a local supermarket - do not use YOUR toothbrush for this step)

In circular motions I rubbed (hard) at the textured salt to aid its removal. I found some areas I had to use my fingers and some areas the salt was stuck fast so I scraped with the toothbrush handle. I was pretty pleased with the results...


Now they will need a coat of varnish, transfers and then a pin wash to finish them off - so please join me for part 2 to see the finished article.

For now here's how they currently look on my table...


Keep young and beautiful.

KF