Showing posts with label containers. Show all posts

Thursday, 15 September 2016

What's in the box? Pt2: Containment protocol - accomplished

Good evening all. 

Glad to be back in the saddle from my brief hiatus and looking to get some hobby on.

Tonight I bring you a chunk of completed hobby (for a change I can all hear you shout). The last few days have seen me square away the first portion of containers that I started a while back.

As you may remember I used salt weathering for the first time on these as a means of testing out the process on something less than vital to my crusade era forces.

When I last posted this is where they were at...


Obviously this was only part done but as I was batch painting these it took a while to get the 9 upto this stage.

Even though I had brushed (vigorously) to remove the salt I found that, as I'd used cellulose paint and not an airbrush, some of the salt was resisting my attempts at removal...

Que the H2O..


After a brief dunk all the excess salt dissolved and was easily removed with a final cursory scrub.

Next stage was detailing and transfers. Very simply I painted the stud skulls with Valejo's Old Gold, dry brushed the keyboards and vents with Leadbelcher and painted the servo skulls with the same method as on my Night Lords; 

Steel legion drab wet brush
Argax earth shade wash
Karak stone wet brush
Ushabti bone dry brush
Skull white highlight

I then applied the transfers. I divided the crates into blocks of 6 and 3 so that the identification marks would cycle in lots of 6 - handy in future to use these as objectives in games. I went for generic Mechanicum for the simple reason that these will be used in lieu of buildings on my city fight table and as free standing scenery in my Zone Mortalis games, and as I have several armies it made sense to have the containers as equipment shipped from Mars to assist in the war effort (regardless of which side you're on).


Once the transfers were on it was time to try another new technique - the pin wash. I know a lot of great painters use this process (including our very own Drake Seta) but I'd never been brave enough to try it on anything other than test pieces. So I went in two feet first and eyes closed.

The first stage was sealing the paint - for this I used Purity Seal. I've read a lot of criticism about purity seal and to be honest I've never had an issue - however on this occasion I did. Half the containers started to frost up. I had read re-spraying immediately can reduce the effects - which I did and also to spray another varnish on also removed it - which I also did (with the Army Painter anti-shine matte varnish). Even after those salvage attempts some of the containers looked a little pink in places. I had to take it on the chin and move on, hoping the next stage might rectify the problem.

Next I mixed up some thinners with Burnt Umber oil paint (I stumped up for the good stuff). I mixed until it was the consistency of emulsion paint.

Then I applied a coat, covering all the containers parts in one pass.


By the time I'd coated all 9 the first one was ready to be rubbed within an inch of its life - I chose kitchen roll for this job, rubbing loosely all over then rubbing in one pass with my thumb in the triangular sections made by the ribbing on the container sides. I also paid extra attention to where the transfers were.


I found that a little thinners on a brush and a quick swipe across the transfers helped them to pop a little more.

And so the 9 containers were done...


And in situ on a gaming board section...


And a little fun...


Now it's just a case of repeating the process for at least another 9.

Hope you enjoyed seeing something actually finished for a change - something I hope to emulate in my next post concerning the boys in midnight clad.

And remember - never trust a skinny chef.

Peace out.

KF

Friday, 22 July 2016

What's in the box? Pt1

Well on this occasion NOT Gwenyth Platrow's head...

Sorry - spoiler alert.

Good evening all - news of my death has been greatly exaggerated and I'm back tonight with something non marine (or robot) related.

Tonight I'm following Tylar's lead and bringing you a post that is more scenery related.

The reason I'm doing this is that I've tried salt weathering for the first time and thought you may benefit from my trials and errors.

So we've all seen the rather awesome containers from Games Workshop...


Well my plan was to use them in lieu of building on my gaming table so they will offer valuable cover to most sized units (including Questoris Knights) and as such I needed a lot of them and a paint scheme that was both quick and painless.

I decided that the majority (if not all) my containers would be based in a Mechanicum shipping facility and so would be red ala the scheme on the GW website but I did want them to be heavily used and be applicable to my city table and my zone mortalis board.

So once the containers were built I gave them a liberal spraying with a can of Leadbelcher.


Once this had dried I added some weathering to break up the uniformity - this was done with a 1:1:1 mix of warplock bronze, rhinox hide, leadbelcher and applied with a natural sponge (bought from an arts and craft store). Once this had dried I applied patches of Agrax Earth Shade to tint the metals. I focussed the weathering to the underside of the container and the bottom of the doors with patches dotted around other areas like the edging of the doors.


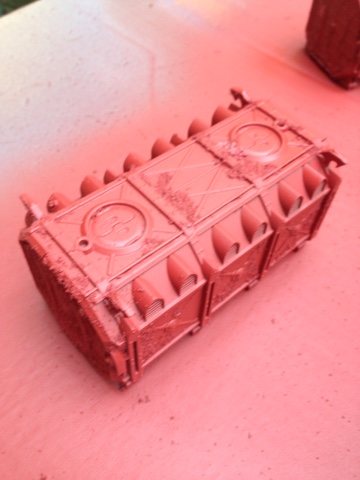
So with the under painting done it was time to apply the salt - which would act as a mask for the sprayed layers which would act as the containers colour.

With the salt more is more - I found that there seems to be too much salt applied when it's actually the right amount. Simply paint water on to areas you want the base metal to show through the sprinkle salt on the areas. I used a mix of sea salt and table salt and once applied I left the containers outside to allow the water to dry and once dry I rubbed the areas slightly to make the areas less uniform. I again focussed my efforts around the bottoms of doors and side panels and the underside of the containers.


Once the salt layer was dry I laid them all out and began spraying. Now I've seen this technique used before with airbrushes but my intention was to use spray paint - so I prayed that the technique would work out for me.

My first coat was with a red primer from Halfords here in the UK but I guess any matte primer spray would also work. I made sure I had a good even coat all over (I did notice some salt falling off at this point but didn't worry too much).


As you can see the salt sits on the Duracell as texture. Once dried I did a zenith highlight with a can of Mephiston Red.


Now for the moment of truth - the removal of the salt.

My weapon of choice - a cheap/firm toothbrush (bought in bulk from a local supermarket - do not use YOUR toothbrush for this step)

In circular motions I rubbed (hard) at the textured salt to aid its removal. I found some areas I had to use my fingers and some areas the salt was stuck fast so I scraped with the toothbrush handle. I was pretty pleased with the results...


Now they will need a coat of varnish, transfers and then a pin wash to finish them off - so please join me for part 2 to see the finished article.

For now here's how they currently look on my table...


Keep young and beautiful.

KF